How to Integrate Science and Reading

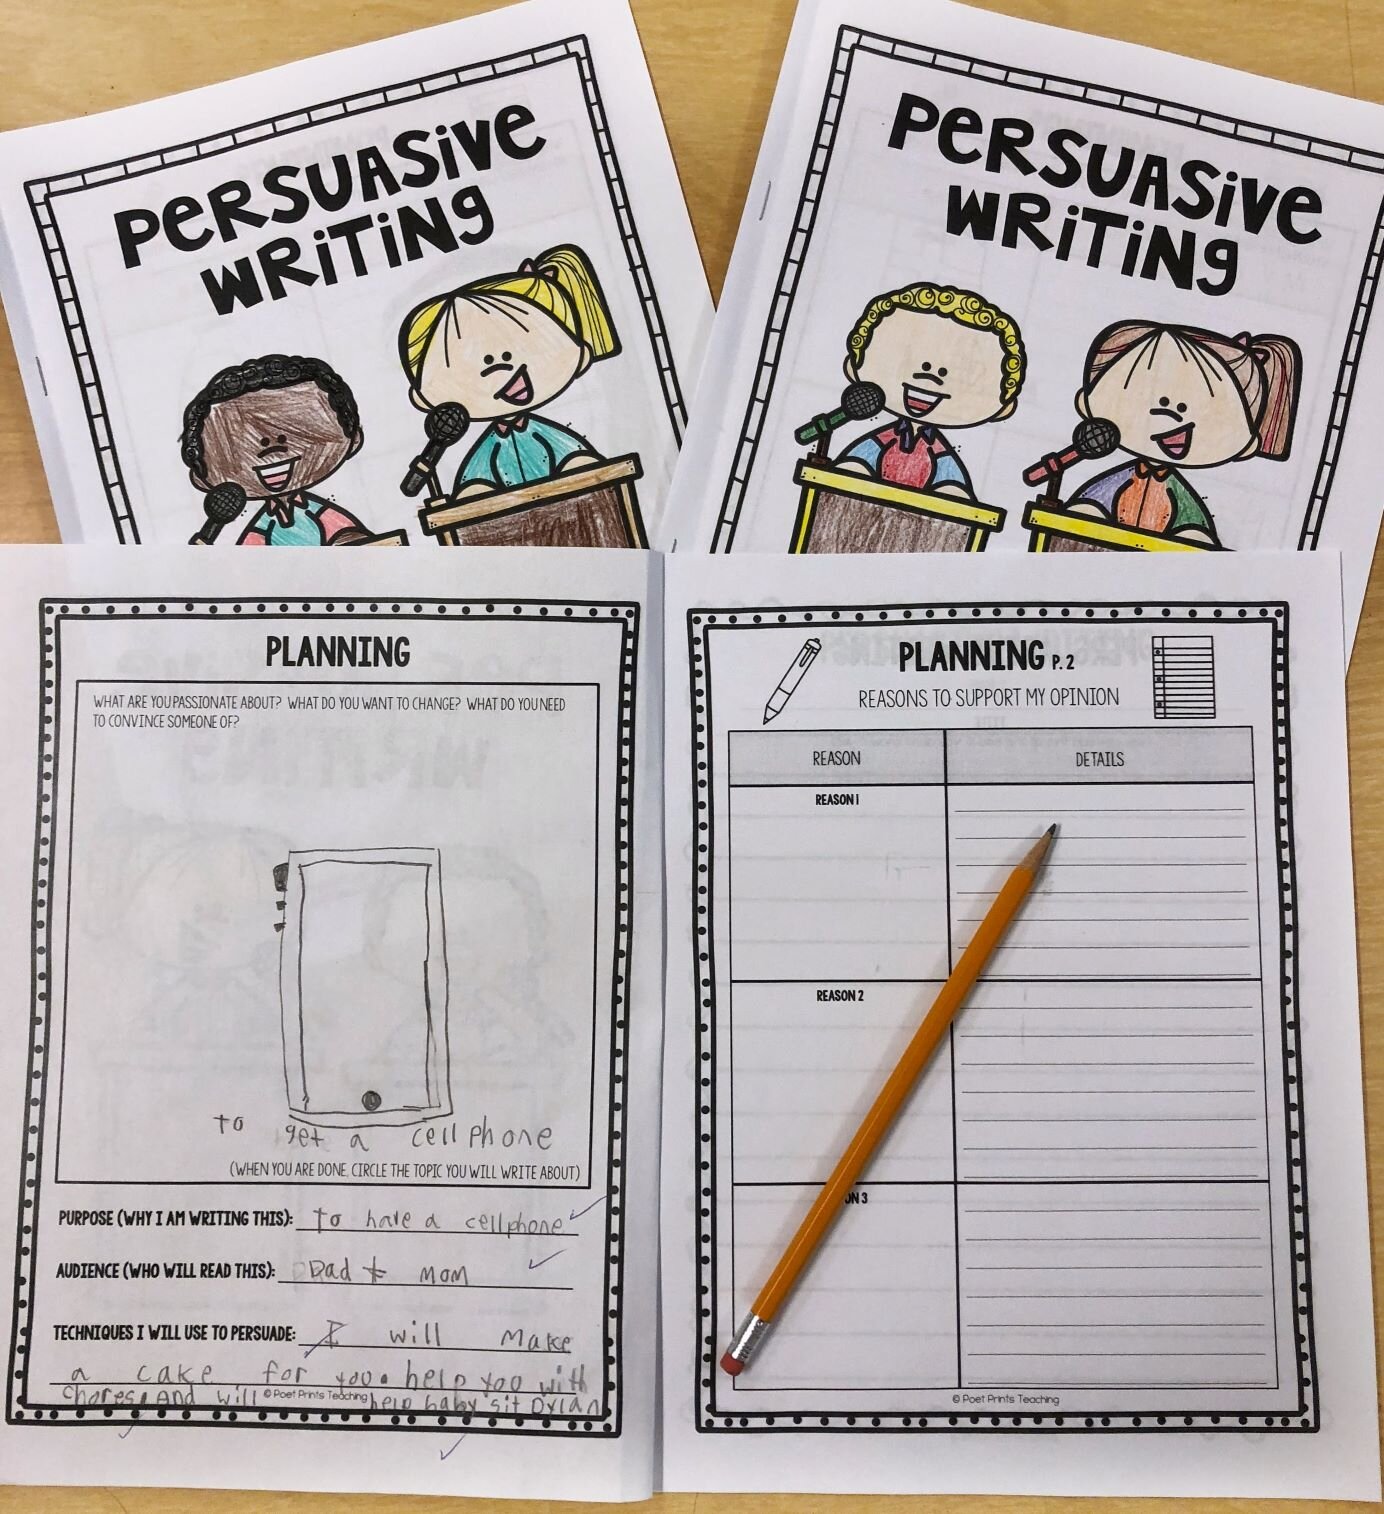
I don’t know about you, but my classroom always seems to be short on time. Traditional classroom schedules have always taught each subject separately: math, reading, writing, science… all done in their own blocks. But we know that integrated learning is such an effective way to teach learning targets at once. Integrated learning blends subjects together, teaching more than one at the same time… and I am a HUGE fan of integrating science and reading, especially in 3rd grade.

reading-and-science-integration-header.jpg

Why is reading important in science?

So much of science involves carefully examining informational text. Scientists do extensive research on a topic in order to determine if the topic is worth further investigation. They pour through books to glean information and make predictions, to further their understanding of a topic, to form hypotheses and research proposals. They read other scientists’ research to learn more.

Reading truly is an essential part of science. It’s an important skill for research. And it’s our job to help students learn how to do this accurately. We can teach them how to gather information. What kinds of information to look for. How to understand the information.

Teach Students to Examine Informational Text

First, we need to teach students how to look at informational texts. There are so many genres out there. We need to teach students how to navigate these. Students need to read informational texts differently than fantasy texts. They need to read fiction texts differently than nonfiction texts.

So, first and foremost, we should tell our students how to identify these texts.

From there, give students some informational text and help your students to take a closer look at it. What do they notice about the pictures? What do they notice about the vocabulary?  Read the text through together and have students make connections to things they might have experienced in their lives. For example, if you are reading about fossils, have students discuss what they know about fossils before reading. Then afterwards, have them reflect on if the information they shared is accurate or not.

Reading informational text often includes looking at the text features: headings, subheadings, bolded words, pictures, diagrams and more. The text features in a piece of informational text can give us important information as well! When we are looking at informational text I try to stop and point out what I’m seeing in each text feature.

The title of this page is ‘Digging Up Dinosaurs’ I wonder what that tells us about what we are going to read.” “What can we see in this picture? What new information can it tell us?”

Modelling our thinking, out loud, is an important part of teaching students to read informational text.

Apply Reading Skills to Science

While reading informational science texts, make sure to apply reading skills. There are several things you could do. Throw in some comprehension questions. Have students underline new vocabulary words and find the definitions. Have students sequence events from the informational text. Distinguish facts from opinions in a text. Compare and contrast similar information.

I can’t wait to share more about how I integrate reading and science in third grade. It’s saved me so much time, and I know it can make an impact in your classroom.

If you’re ready to give it a try now, take a peek at Reading into Science, my brand new resource line that integrates close reading with engaging STEM extensions! You can check out the first lesson for FREE.

Pin Me for Later!

Text: How to teach Reading and Science together!Image: Text is displayed over images of stacked books and science materials.

Text: How to teach Reading and Science together!

Image: Text is displayed over images of stacked books and science materials.

Third Grade Writing Lessons

I love teaching third grade writing lessons. There is something so special about watching the light turn on for young writers. To be sure, kids can be good writers before third grade, but grade 3 is such a great time to hone in on specific writing skills. Take a look at some of my favorite lessons and activities that help to build foundational writing skills in third grade.

Text: The Best Writing Lessons for Third Grade Image: School supplies are displayed on a blank white surface.

Text: The Best Writing Lessons for Third Grade
Image: School supplies are displayed on a blank white surface.

Writing With Transition Words

Transition Words.jpg

Teaching students how to use transition words in their writing is a great way to preserve your sanity! An essay or paragraph that has transition words, makes it much more smooth to read. I like to teach transition words near the beginning of the year so students can use them in all their writing assignments. There are several different ways to teach transition words in an interactive way. Check out this blog post to find five ideas on how to teach transition words.


teaching students to write creative stories

Writing Stories Pin.jfif

Stories are such a fun thing for students to write and also a fun thing for teachers to read! During my story writing lessons, students learn about character, setting, problems and solutions. They plan and build their own stories with a beginning, middle, and an end.

Like almost every lesson in my classroom, I use mentor texts while teaching about stories. What better way to learn how to write a story? Read a story! In this narrative writing blog post you’ll read about how I teach story writing in third grade.


finding ideas for narrative writing

Narrative Writing.jpg

How often have we all heard the sentence, “I don’t know what to write about?” I’m not the biggest fan of prewritten writing prompts, but I also don’t love to leave my students completely without any ideas at all.

This is one of my favorite lessons to help students learn to find their own writing ideas. While teaching about narrative writing, I have students pick a favorite story and then write a creative story based on that book. Narrative writing can take many forms, but students love to put a fun twist on stories they already know.


informative writing with a twist

Informative Writing.jpg

Informative writing is vastly different from story or narrative writing. In story and narrative writings, students can take creative license to make up information or details. In informative writing, students have to learn how to gather information and then write it in a way that makes sense.

When I teach informative writing, I like to have students interview their peers to gather information. This also gives them practice with asking questions. After gathering the information, they write it into a report or a news broadcast. Check out this post for more specifics on teaching informative writing.


purposeful persuasive writing

Persuasive Writing.jpg

And last, but not least, I like to teach persuasive writing in third grade. Kids are already quite good at giving persuasive arguments to their parents or other authority figures. What kid hasn’t tried to negotiate extra dessert, a playdate with a friend or staying up late on a school night? What kids need to learn is how to turn those arguments into great pieces of writing.

In this lesson, students learn how to identify their audience, identify convincing arguments/non-convincing arguments, and write a persuasive essay. And, as you’ve probably guessed, I like to use mentor texts to help my students as they generate ideas for their writing.

The growth that students show during their time in 3rd grade is so immense, and these lessons are some of my tried-and-true favorites for this age.

Pin me for later!

third-grade-writing-pin.jpg


Informative Writing in Third Grade

“Extra! Extra! Read all about it!” The ever-popular phrase that paperboys used to yell while selling newspapers on the street. Newspapers are such great examples of informative writing. Nowadays, I don’t really read the newspaper...ever...but I do like to watch interviews online. I love seeing who or what I can learn more about. And, like many teachers, this gave me some inspiration for a writing lesson. Interviews got my thinking about authentic ways for my students to do informative writing. So, without further adieu, here is what I came up with for teaching informative writing in third grade.

Text: Teaching Informative Writing: A creative lesson for third grade that makes students junior reporters! Image: A camera is displayed on a filmmaking set.

Text: Teaching Informative Writing: A creative lesson for third grade that makes students junior reporters!
Image: A camera is displayed on a filmmaking set.

Setting the Scene

This lesson is a fun twist of informative writing as the students are the ones gathering the information firsthand. 

First, we have to introduce our writing lesson in a creative way. Make it exciting! Set the stage, by having students imagine themselves as TV interview hosts. Show YouTube clips of reporters on the scene interviewing, or news anchors giving an interview. I like to find local human-interest pieces that the students can relate to. Or show them some celebrity interview for a movie they have all seen or heard of. It’s your job as the teacher to really “sell” this part.

During this step, it’s also important to define the term “informative writing”.

Informative writing teaches a reader new and true information. 

Then look for examples of that in the interviews you watch. Make an anchor chart to track how the reporter sounds, who they are interviewing, and what information the audience learned through the interview. Track any else you want your students to be focusing on as well.

Brainstorm Interview Candidates

After watching some sample interviews and discussing them, it’s time to brainstorm. Come up with a list of people that the students can interview. There really isn’t a wrong answer, but here are some ideas to get you started:

  • A family member (mom, dad, sibling, grandparent, uncle, etc)

  • Someone who works at the school (principal, librarian, custodian, teacher, etc)

  • A friend 

  • A community worker (librarian, coach, police officer, nurse, etc)

Make sure there’s an alternative for students who might not have someone. For instance, if students are interviewing grandparents...well...not all kids have grandparents who are alive. Or, here’s another thought. Instead of doing the interviews outside of class time, you could partner students with their classmates so everything gets completed during classroom time.

Work on Interview Questions

Before students get to the interviews, it’s important to do a lesson about what makes a good question. A good question should require more than a one or two word answer. Thus, any question that can be answered with a “yes” or a “no” is NOT a good question. Make an anchor chart of good questions and bad questions. Some bad questions might include, “Do you like chocolate?” or “Do you have a brother?”. Some good questions might include “What are your plans for winter break?” or “What do you like to do when you go home from school?”

Have students write out their questions before conducting their interviews. Then teach students how to take note of their partner’s responses to the questions.

Write the Report

After conducting the interviews, it’s time for students to write their reports. Do a guided writing lesson to teach students how to turn their interview notes into a script. They will have to turn it into a third person script that could be read on the news. If you feel up to it, it’s also fun to teach them some of the news lingo like “In breaking news” or “Thank you for joining up this evening.”

Share Your Findings

There are fun ways for students to share their reports. They could write a newspaper article. They could write an informative essay. My favorite way for students to share their final essays is in an “Evening News Broadcast” style where they sit at a desk and share what they’ve learned about the subject. If you have access to a camera, it’s fun to film these so students can watch themselves later. You could even upload these onto your student’s online portfolios so parents can watch them as well. This helps to integrate media or technology into the project! 

Grab the whole Junior Reporters Unit!

This is such a fun project to do with students and if this sounds like something that’s up your alley, let me help you with some of the prep. I’ve created a Junior Reporters: Informative Writing in Third Grade” unit which contains lesson plans, planning pages for interview pages, final report templates (for either news anchor scripts and newspaper articles), and assessment checklists, interview script pages, good copy newspaper. Let me help you with the planning so you can spend more time with your students.

informative-writing-interview

Spend Less Time Planning!

Looking for a FAST way to plan this informative writing lesson? In just a few clicks you can grab all of the pieces you need. Just print… that’s it.

Informative writing lessons don’t have to be boring. They can come to life by adding some authentic flavor, such as news clips or interview clips. If you try this in your classroom, let me know how it goes! 

Junior Reporters Informative Writing.jpg


Persuasive Writing in Third Grade

The art of persuasion. It seems that many kids do their very best to persuade their parents, friends and, yes, even teachers to see their point of view. Kids are excellent at trying to persuade others to do their bidding. Even my toddler seems to be honing her skills, always trying to find ways to convince me to leave Paw Patrol on for “just one more episode.” But learning the art of persuasive writing can be tricky. So here are some tips that I’ve learned for teaching persuasive writing in Third Grade. 

Text: Teaching persuasive writing in third grade. Image: School supplies are displayed on a table.

Text: Teaching persuasive writing in third grade.
Image: School supplies are displayed on a table.

How Do You Teach Persuasive Writing to Third Graders?

You might be asking yourself: How exactly should I be teaching persuasive writing to Third Graders? Well, over my years of teaching, I’ve found that keeping it as relevant as possible is key. Don’t force kids to create persuasive writing about things they aren’t actually passionate about. Very few kids want to do a persuasive writing piece on if dates or prunes are better for you…..OK, OK….. I hope that no teacher would ever make their students write about that topic, but the point still stands. Give them topics they can get passionate about.

There are so many topics that students could write persuasive arguments about. Here are some ideas:

  • Which makes a better pet: 

    • Dogs vs. Cats

    • Snakes vs. Hamsters

    • Sharks vs. Alligators

  • Should kids be allowed to: 

    • Be principal for the day

    • Own a cell phone, tablet, laptop...really, any type of technology

    • Bring a cell phone to school

    • Bring a pet to school

    • Drive at a younger age

    • Play video games all day

  • Which is Better:

    • Soccer or Baseball

    • Bowling or Mini Golf

    • iPhones or Androids

    • Summer or Winter

    • Winter break or Summer break

    • Chapter Books or Picture books

  • Reasons for:

    • Longer recess

    • No homework on the weekends

    • No homework ever

    • More snack options in the cafeteria

    • Getting a new pet

    • Going to Disneyland on a vacation

    • Going to Hawaii on a vacation

    • Going to Mexico on a vacation (can you tell that I really want to go on vacation?)

Use a Mentor Text to Teach Persuasive Writing

So, now that you have some ideas, it’s time to teach your students what the word “persuade” means. I like to write this word on an anchor chart and then read a mentor text that is a piece of persuasive writing. I’m a big fan of using mentor texts during writing lessons.

When teaching persuasive writing, I love the story “I Wanna Iguana” by Karen Kaufman Orloff and David Catrow. This story is a series of letters between a mother and son. In his letters, the son is trying to convince his mom to let him get a pet iguana. In her letters, she is making counter arguments against his reasons for getting an iguana. Some arguments are good and some aren’t as good. In the end, Alex’s reasons prevail and he gets his iguana. While this is my favorite mentor text to use when teaching persuasive writing, there are plenty of other great mentor texts out there.

Here are a few great mentor texts for persuasive writing:

  • Can I Be Your Dog? By Troy Cummings 

  • Rufus Goes to School by Kim Griswell

  • The Big Bed by Bunmi Laditan

  • Escargot by Dashka Slater

  • Purple, Green and Yellow by Robert Munsch 


Discuss Ways to Persuade an Audience

Persuasive Writing: A type of writing that tires to convince a reader to agree with you.  How can we persuade readers? What do we want?

Persuasive Writing: A type of writing that tires to convince a reader to agree with you.
How can we persuade readers? What do we want?

After reading the story of your choice, talk about the techniques that the authors use to persuade an audience. Make sure to pull out specific examples of the language used in the story so students can replicate the language in their own writing. Then have students brainstorm other ways to persuade a person or audience. They might come up with ideas like offering a gift or incentive, using humor, appealing to a person’s emotions, scaring the audience into doing something, or using logic.

Show Examples and Non-Examples of Persuasive Writing

Next, we need to show examples and non-examples of persuasive writing. An argument isn’t always a good argument (as seen in the book I Wanna Iguana). Students need to see that some techniques to persuade aren’t effective.

We should also talk with students about when they might have seen examples of good persuasion and poor persuasion in their lives. Social media, magazine ads, billboards, radio ads, and commercials all use the art of persuasion. Drawing students’ attention to this will be helpful when they try to write their own persuasive essay.

Reread your mentor text and pause after each argument made in the story. Ask students if they think the argument was a convincing argument or not. Record the convincing and unconvincing arguments on an anchor chart so students can visually see all the arguments. This will help students more easily determine the difference between good and bad arguments.

Write our Own Persuasive Essays

As you can see, there are a lot of steps before students actually start writing. In order to set students up for success in creating their own persuasive essay, they need to understand what makes a good argument. Before they start writing, they need to do some planning. And before the students can do the planning, you need to model what this would look like. 

Students begin planning their persuasive essays.  In this example a student is planning to persuade their guardian to buy them a cellphone.

Students begin planning their persuasive essays. In this example a student is planning to persuade their guardian to buy them a cellphone.

Draw up a sample planning page on the whiteboard or on an anchor chart and walk students through the planning process. First, start with recognizing the audience. For instance, trying to convince parents to take you to Disneyland, or trying to convince your brother to start a paper route with you, or trying to convince your teacher to stop giving homework. Then have students plan their arguments.

After planning out the writing, students can write their rough copies. Give students time to edit their work. Finally, they can complete the good copies.

If you want to save yourself some time, I’ve created all these resources for you in my Persuasive Writing mini-unit package. There are detailed lesson plans broken down into five parts, differentiated planning pages, writing pages, a checklist to help with their editing, and evaluation pages for their writing. There is even a digital template included for distance learning or Google Classroom

Persuasive Writing.JPG

Spend less time planning!

Looking for a FAST way to plan out a persuasive writing unit? In just a few clicks you can grab all of the pieces you need: a lesson plans, anchor chart samples, planning pages, rough and good copy student sheets, and assessment! Just print… that’s it.

Share the Persuasive Writing - Ideally, with a Real Audience

After the good copies are finished, I love giving my students a chance to share their writing with an audience. If they wrote letters, they could read the letters to the appropriate people. They could post their essays on a bulletin board for people to read. They could read their persuasive writing to their peers. I think sharing and celebrating the finished product is important!

The art of persuasion is important. Teaching persuasive writing can be time-consuming, but it’s so worth it in the end. 

Text: Authentic Ways to Teach Persuasive Writing in Third Grade Image: Text is displayed over school supplies

Text: Authentic Ways to Teach Persuasive Writing in Third Grade
Image: Text is displayed over school supplies

3rd Grade Narrative Writing: Finding Ideas

One thing I love to teach in 3rd Grade is Narrative Writing. Third Grade is the time when students can really engage with creative writing, the writing process and narrative writing. I especially love to teach students about finding ideas. So often our students have ideas locked inside their minds and they need the proper key in order to unlock all these great ideas. One of my favorite ways to unlock their great ideas is by using their favorite books and novels! It’s so funny how kids can go from completely stuck to full of ideas in the blink of an eye and this writing lesson totally helps with the question, “I don’t know what to write about!”

Text: Narrative Writing in Third Grade, Finding Writing Ideas Image: Text is displayed over sharpened pencils.

Text: Narrative Writing in Third Grade, Finding Writing Ideas
Image: Text is displayed over sharpened pencils.

Where Can Ideas Come From?

Image: “Ralph Tells A Story” by Abby Hanlon is displayed on a student desk.

Image: “Ralph Tells A Story” by Abby Hanlon is displayed on a student desk.

So let’s talk about these ‘keys’ for a minute. As I said before, students often have ideas locked inside their minds and they need the proper key in order to unlock these great ideas. Where can Ideas come from? Kids are often stuck and need help finding ideas. I love using books to inspire ideas. I especially love the picture book “Ralph Tells a Story” for this. 

Ralph is a boy who really struggles to find an idea of what to write about. Over the course of the story, Ralph discovers that there are stories all around him! He could write about an inchworm in his backyard, the class goldfish, the markers in his desk….the stories are endless! My reluctant writers love this book because it’s funny and gives solutions for how to unlock their ideas. 

There are some other amazing books about finding ideas for writing..

  • “What Do You Do with an Idea” by Kobi Yamada

  • “Idea Jar” by Adam Lehrhaupt

  • “Any Questions” by Marie-Louise Gay

Do you know of any other amazing books about ideas for writing? Send me a message, I’d love to add them to my list!

Use Books Students Love to Find Ideas

When teaching my students about narrative writing my absolute favorite thing to do is have students use books they already love to find ideas. I want to teach my students to draw on the books they are reading to inspire a new story during personal writing time. I like to tell my students that “Authors are inspired by what other authors have written”. So I want to teach my students to be inspired by the books around them. 

So the first step that I take while teaching this lesson is to brainstorm. We brainstorm stories we already know and love. Then we think of new adventures and ideas for these characters.

  • Scaredy Squirrel - Let’s write a new adventure where Scaredy heads into space!

  • The Magic Tree House - Jack and Annie visit our classroom!

  • Who Would Win Books - We could write Butterfly vs. Bumblebee or Raccoon vs. Chihuahua 

Once students start thinking about books they are already reading, it gets easier for them to think of new ideas for the characters or book style! 

Model How to Create a New Story

Don’t forget to verbally model your through the process while you brainstorm. Students need to see how the writing process works. Creative writing first starts with creative thinking. Narrative writing begins with an internal dialogue with yourself. So don’t forget to model each step of the writing process during the writing lesson. This helps to prepare them for when they brainstorm their own story.

Wow!  We sure love Scaredy Squirrel! He’s so funny and he gets into so many silly adventures.  I wonder what else he could possibly get into?  Hmmm.  We’ve seen him be terrified to head to the beach.  I wonder how he’d feel about going to space!  What kind of things would he be scared of? How would he plan to head into zero gravity? What would he bring with him?

Write the Story 

After brainstorming ideas, I model how to create a new story. Then students will plan their story and then begin to write. After writing, I always give my students time to edit and then write their good copy. Sometimes I even let my students type their good copies on the computer.

In my Book Inspiration Writing Lesson package, I have a planning page, writing pages, and a checklist to help with their editing. There is even a digital template included in this package so students can type their good copies into a well-laid-out template.

narrative-writing-ideas.jpeg

Spend less time planning!

Looking for a FAST way to plan this writing lesson? In just a few clicks you can grab all of the pieces you need: a lesson plan, planning pages, rough and good copy student sheets, and assessment! Just print… that’s it.

Share The New Story

One thing that I’ve learned over my years of teaching is that it’s important to give students a chance to share their work. This gives them a sense of ownership of their work and it also instills pride for their hard work.

I like to mix up the way my students share their work. Sometimes I’ll create a class library of these new books. Students can read each other’s stories! (As a bonus, this may also give them new ideas for their next piece of narrative writing.) 

Other times I’ll host an Author’s Chair, where students have a special place to share excerpts from their stories with their classmates. I’ve even had my students publish their stories digitally on a secured classroom blog so parents can read the stories at home. Parents love to check out their children’s creative writing.

As you can probably tell, I love teaching the writing process to my 3rd Grade students. There is something special about teaching them about creative writing and narrative writing. Do you have any fun ways to teach the writing process to your students? Do you have any “go-to” third grade writing lessons?

5 Ways to Teach Transition Words in Third Grade

First, kids learn letters. Second, they learn words. Then, they use phrases. Afterward, they use sentences. At some point, they learn transition words. Do you see what I did there? Transition words are important to help with the flow of writing. We, as adults, often use these words without even thinking about it. But we need to explicitly teach transition words to our students. So I thought I’d put together a list of some fun ways to teach transition words in third grade.

Text: 5 Ways to Teach Transition Words in Third Grade Image: Two pencils are displayed on a red background

Text: 5 Ways to Teach Transition Words in Third Grade
Image: Two pencils are displayed on a red background

How Do You Teach Transition Words in Third Grade?

I think we can all agree that transition words are important. But we’ve all seen writing where students just repeat the same transition words over and over. How many times have we read an essay that has “And then…..And then…..And then…..” It’s up to us to explicitly teach transition words to our students. Otherwise, we’re doomed to read “And then….” essays for the rest of the school year. There are a variety of strategies that we can employ to help students learn their transition words. 

1. Write a Class Story Together

One way that I love to teach transition words is through modeled class stories. I will set up my flip chart with some transitional phrases. It might look something like this:

Once upon a time, there was a __________ and a _________.

First they _________________

Next they ________________.

Afterwards, they ________________. 

Finally, they ___________________. 

It was a _________ day.

Students love filling in the blanks together. In the end you might end up with a story like this:

Once upon a time, there was a frog and a duck. First they had a swimming competition. Next they went for lunch at McDonalds. Afterwards, they had a jumping competition. Finally, they went to bed because they were tired. It was a long and busy day.

Students like to create class stories together and share their ideas. After doing a story as a whole class, you could put students into groups and have them create their own stories, using the same template. Or you could have students create stories individually. Personally, I like doing it as a large group and then as small groups, because this fosters cooperation and communication skills.

2. Use Your Fingers

When students start thinking about the order of events in their story, I get students to use their fingers as they say each event. This helps them identify the order or first, second, third….and so on. Now, it’s OK if they use the “first, second, third…” as transition words, but you’ll also want to teach them other words to expand their vocabulary and make their writing flow better.

3. Create a Simple How-To Book

This is a super effective transition word resource that teaches students to use 3-4 transition words to write a simple instructional ‘how to’ story. As a class, we create a book titled “How to Do Almost Anything in Four Easy Steps!”. This helps to get students in the mindset of writing their ideas in the correct order and teaches the importance of basic transition words. I find that this is a great lesson for the beginning of the year. 

In this package, you’ll find sequence word cards to display in your classroom, planning paper, a self-assessment tool, the class book title page, and a variety of story papers for students to write on. 

4. Video the Outcome

To take this above resource one step further, you can have students create a step by step guide of how to make a peanut butter and jam sandwich, and then video the outcome. One of my teacher-friends does this with her class each year. First, she shows this video of a Dad recreating his children’s instructions for making a sandwich. It’s quite funny!


 After watching this video, the students have to write down instructions for how to make a peanut butter and jam sandwich. What the students don’t know is that my friend takes their instructions and creates a video of herself following the instructions. At one point, she even put peanut butter on her face because the student wrote “Put peanut butter on face.” 

Yes, this is a messy and silly idea. However, after this lesson, her students were extra careful when sequencing their writing. 

5. Traffic Light Transitions

I stumbled across the video below all about Traffic Light Transitions. It would be so easy to turn this into an anchor chart for the classroom. Students can help you brainstorm different transition words or phrases that belong in each section. 

Teaching transition words doesn’t have to be complicated. Even simple methods like these will help students to grasp the concept. And remember, the more students practice, the more adept they become at using transition words in their writing. 

BONUS IDEA: Practice transition words in journals

I am a huge fan of journal writing in third grade, it’s one of my favorite ways to build relationships and formatively assess writing. Once we have learned transition words, and students have access to a bank of transition words, personal journals are a great place to practice using them on a regular basis. Retelling events from our week naturally lends itself to using transition words, so it’s awesome practice. You can snag some of my favorite journal prompts below!

Pin me for later!

Text: 5 Ways to teach transition words in third grade Image: School supplies are displayed on a piece of paper.

Text: 5 Ways to teach transition words in third grade
Image: School supplies are displayed on a piece of paper.

Grade 3 Science Lessons - Especially For Teachers in BC

I’ve spent most of my teaching career in grade three. I have a soft spot for grade three students. There’s something about the way that they are not-quite preteens, but no longer little kids that is the perfect sweet spot for learning. Teaching grade 3 science lessons are a lot of fun, we explore atoms and molecules, look at landforms around us, get outside with biodiversity, and even grow our own plants to see life cycles in person!

Text: Science Lesson for Grade Three Image: A student examines a beaker with a magnifying glass.

Text: Science Lesson for Grade Three
Image: A student examines a beaker with a magnifying glass.

Not teaching in BC? You might be looking for NGSS (Next Generation Science Standards) aligned lessons and ideas for 3rd grade. That’s over in this post: 3rd Grade Science Topics

how do you teach science in grade 3?

When it comes to teaching science lessons in grade 3, I’ve always taken the hands-on approach. I love how invested third graders are in project-based learning, and how willing they are to try an inquiry-based investigation. Grade 3 science is perfect for lessons like these! 

But don’t be mistaken, I don’t hand students a project-based learning activity and walk away. There is so much scaffolding that goes into hands-on projects. I start every single science unit with teacher-led learning to give students at least a little background information on our new topic.  We learn new vocabulary, read informational texts to build a knowledge base, and then set off on student-led learning. I find that this approach makes our project-based and inquiry-based learning way more successful.

what are the topics in grade 3 science?

In BC, our science curriculum is mainly guided by the BC big ideas.  The BC Big ideas for Grade 3 science are:

  • Living things are diverse, can be grouped, and interact in their ecosystems

  • All matter is made of particles

  • Thermal energy can be produced and transferred

  • Wind, water, and ice change the shape of the land

When teaching these as topics, I teach these ideas in 5 distinct topics:  Landforms, Matter, Thermal Energy, Biodiversity, Plants. To read an in-depth post on each topic be sure to click through!

Teaching Local Landforms

Science-lessons-landforms-header.jpg

I’ve always been a big believer that science lessons can (and should!) be made as relevant to your students as possible. When we study landforms I try my best to connect each landform to ones in our local community or ones that may be familiar to my students. Mountains? I’ll choose the one we can see from our classroom. River? The local summer swimming spot. Lake? The one we visit during our last field trip of the year. The more I can connect our landforms unit to our local community the better. This post has my absolute favorite landforms projects and activities.


States of Matter Activities

states-of-matter-science-lessons-header.jpg

The three states of matter is a topic that our curriculum (here in BC) circles back to again and again… and with the right activities and lessons, it’s just so much fun! In Grade 3, we look at how all matter is made up of atoms, and what the atoms look like in a solid, liquid, and gas. We’ll build the particles out of classroom materials, act it out with our bodies, and get hands-on with experiments that show all three states. This post lays out how I introduce what matter is (and isn’t!) and some simple activities to get you started.


How is Thermal Energy Transferred? Science for Kids

thermal-energy-science-lessons-header.jpg

We learn about Thermal Energy after Matter so that students already have a good understanding of atoms and how particles move. I have always chosen to study thermal energy in the winter so that we can use hot cocoa to see conduction in action (as our hands warm-up) and try out various materials as insulators against the cold. There are so many fun thermal energy activities to try in your classroom!


Biodiversity Science Lessons

biodiversity-science-lessons-header.jpg

In our biodiversity unit students discover that biodiversity is literally ALL around us. This is a great unit for getting outside of the classroom. Kids love this unit because it looks so closely at plants and animals… and anything to do with animals is always a hit in grade 3. After we look at just how diverse our own local ecosystems are, I send students off to explore local biodiversity and choose a single plant or animal to research in greater detail.


Inquiry Based Science: How do Plants Grow?

I have found my plants unit to be the most successful as the final unit of the year. By this point in the year, students are capable of planting and tending to a small bean plant completely independently. They can also observe and document plant growth with little assistance from a teacher. I’ve usually conducted this unit as inquiry-based learning, and it’s always such a hit. These inquiry-based plant experiments are such great science lessons for grade 3.

Grade-3-Science-Lessons (5).jpg
States of Matter Activities for Kids

States of Matter is the one concept that repeats over and over in our science curriculum up here in British Columbia.  Understanding particles really is so fundamental to so much of chemistry, physics… and science in general!  So, I understand the repetition! Take a peek at the states of matter activities and lessons that have been the most successful in second and third grade!

Text: States of Matter for 2nd, 3rd, and 4th Grades Image: A series of colorful beakers are displayed on a white surface.

Text: States of Matter for 2nd, 3rd, and 4th Grades
Image: A series of colorful beakers are displayed on a white surface.

What is matter and what is it made of?

“What is Matter” anchor chart.

“What is Matter” anchor chart.

When we start introducing the concept of ‘matter’ to students, we start with a simple anchor chart, like this one.  Almost everything around us is made of matter.  You are made of matter!  I am made of matter!  This desk is made of matter. Anything we can touch and hold is made of matter (We do talk about how thoughts, and feelings are not made of matter).   Matter is made of teeny tiny particles called atoms. 


There are 3 states of matter

Next, we talk about how matter exists in three states: solid, liquid, and gas. Solids keep their shape.  Liquids take the shape of their container.  And gasses expand to fill the whole space (or container). There are a couple of hands-on ways we explore these three. 

First, I’ll write these 3 definitions on the board or on three separate papers. Before we even create an anchor chart, we will start sorting tangible items in our room.  This is a ‘get up and move activity.  Together, we’ll grab objects and start sorting them into categories.  (HINT: blow up a few balloons ahead of time so you have a ‘gas’ or two to sort!)

If I don’t want to use physical objects, we’ve also done a card-based sorting game.  This one is fun because it’s easy to make a copy so small groups of students each have their own deck to sort.  It’s also easy to use as an exit ticket at the end of a science class.  I’ll just hold up a card and ask them to tell me if it’s a solid, liquid, or gas! 

states-of-matter-sorting-activity.jpg

This card-based sorting game comes from my Matter for Little Learners science unit. It was super easy to print out a few decks of sorting cards and play the game in small groups around the classroom.

The particles in a solid, liquid, or gas are different

All matter is made of teeny, tiny particles called atoms and the atoms in a solid, liquid, and gas are different from each other. There are a few ways I teach this process in second and third grades:

See the particles with a simple activity…

A simple activity template to show the particles in a solid, liquid and a gas.

A simple activity template to show the particles in a solid, liquid and a gas.

Using a simple template (you can also just draw and photocopy a template like this) we show what the particles look like in each state of matter.  Solids have particles tightly packed together.  Liquids are more spread out with room to move.  Gases are very spread out and move past each other quickly.  This is an easy thing to create with whatever you have on hand. In the past, I’ve used cheerios glued to a simple template, bingo dabbers on cardstock paper, sequins glued on paper, etc.  There is no ‘right’ material to use as the atom!

Act out the particles…

In this version, each student becomes an ‘atom’. (This may work best outside) Use string or yellow traffic cones to create a circle on the floor barely big enough to fit all of your students standing up.  Ask all students to stand inside.  Pack them in tightly so they are barely able to move. “You are now a solid!  Atoms in a solid are tightly packed but cannot move past each other.  They can wiggle a little from side to side, but that’s it!”    

Now, make the circle a little bigger. This time the students might be able to walk slowly past each other to change spots.  “You are now a liquid!  Atoms in a liquid have some room to move carefully past each other.”

Now, make the circle MUCH larger.  The students should have space to jog/run.  Ideally, this would be done on a field or in a gymnasium.  “You are now a gas! Atoms in a gas move freely at high speeds and take up all of the space they are given.”

Let me do your planning

Looking for a whole unit?  I have you covered whether you are just introducing little learners to the concept of matter or getting a little more in-depth with students in third or fourth grades.  Units are full of nonfiction reading, activities, and complete lesson plans. Let me take one piece of lesson planning off of your plate! 

  1. Matter for Little Learners

  2. States of Matter for Third and Fourth Grades

Pin me for later!

Text: States of Matter Science Ideas for 2nd, 3rd, and 4th GradesImage: Three students participate in science activities.

Text: States of Matter Science Ideas for 2nd, 3rd, and 4th Grades

Image: Three students participate in science activities.

Rachel PoetkerComment
Teaching Local Landforms

Teaching all about landforms is a big part of our grade three science curriculum here in British Columbia.  It’s one of my favorite units because it’s a topic that lends itself well to outdoor and interactive learning.  I try to ensure that teaching landforms is as hands-on as possible: we head outside to explore our own local landforms and we make as many student-led projects as possible!  A few things happen in my classroom to make a landforms science unit successful at the second and third-grade level… take a peek!

Text: Science Lessons About Landforms for 3rd and 4th Grades  Image: Text is displayed over an ocean landscape.

Text: Science Lessons About Landforms for 3rd and 4th Grades Image: Text is displayed over an ocean landscape.


Keep It Local

A ‘local landforms’ anchor chart.

A ‘local landforms’ anchor chart.

Teaching about landforms doesn’t have to be theoretical… there are landforms all around us! I’ve found that teaching about our own LOCAL landforms is the best way to hook students in and keep them invested in the unit as a whole.  (We did this in our biodiversity, water cycle, and plants units as well).  We try to make as many connections as possible to places and locations that are familiar to them. Even better if we can visit some of these places during our unit!


Pre-Teach Vocab

I know… I know… I’m starting to sound repetitive on this one,  but my ‘secret sauce’ to successful science is to pre-teach new vocabulary before we really dive in to a new unit.  That means starting with a few lessons on landform vocabulary.  I’ll set up vocabulary words around the classroom and we will do a ‘vocabulary hunt’ where students can search for definitions.  We might also set up a vocabulary ‘memory game’ where the vocabulary words and definitions are placed face down on the carpet and are flipped face up one at a time, just like the traditional ‘memory’ card game. These activities help new words to become familiar enough before we really dig into our science lessons. 

Get Outside and Get Observing

You will be able to find at least one landform example on your school grounds… so find it, sketch it, and label it!  Our school was ON an island, with a view of a mountain… two landforms in one! 

Nothing to observe? The outdoors is the perfect place to create a sketch of what a landform might look like on blank paper.  Sketch an island!  Draw a picture of a the place where a river meets a lake (this is called a delta).  If possible, I like to teach most of this unit from outside of the classroom.  

Explore Local Landforms In Depth

Our ‘Local Landforms’ flipbook project.

Our ‘Local Landforms’ flipbook project.

More local landforms? Shocking!  But I really do believe in making local connections to the curriculum wherever possible. We ended our landforms unit with a flipbook project that asked students to think about all of the local versions of as many landforms as we could think of.  A local lake, a local waterfall, a local valley, a local desert, a local cave, a local ocean, etc.  It was neat to watch them make connections to places they had all been or heard about. We also used our classroom devices to research places to help fill gaps for students who hadn’t had firsthand experience with each place and to add facts and details about each location. I, personally, had never been to a local waterfall, so this research component was helpful for me as well!

Teaching-Landforms-Button

Let me plan your landforms unit!

Looking for a whole unit?  The complete landforms science unit features nonfiction reading passages, vocabulary, teacher-led lessons, FUN activities, project-based learning, and detailed lesson plans all along the way.  Let me take this off your plate!

Pin me to save these ideas for later!

Local-Landforms (3).jpg
End of the Year Teacher Organization Ideas

Have you started an end of the year countdown yet? The last weeks before summer break can be a bit (okay, a lot) chaotic in the classroom, but they are also the perfect opportunity to get ahead for back to school.  I would much rather get organized in May/June than feel overwhelmed and behind in August/September… no matter how tired I am at the end of the year.  Maybe it’s my enneagram 1 personality, but being properly organized helps me to feel ready for a break.  And I am ready for summer break this year.  These organization ideas for the end of the year will help to set next year off on the right foot!

Text: How to get organized before summer break. Image: A notebook, pencil, paperclips, and pencil sharpener are displayed on a white surface.

Text: How to get organized before summer break.
Image: A notebook, pencil, paperclips, and pencil sharpener are displayed on a white surface.

There are a handful of things that I always try to do before leaving school for the summer.  Take a peek into my Year End Checklist:

End of the Year Must-Do Checklist

  1. Recycle, donate, or toss student and teacher supplies that don’t work. It’s a great time of year to declutter and make sure everything is working and/or has lids! This includes supplies that just don’t work in your classroom.  Do you find yourself never reaching for that class set of pastels? Time to send them somewhere else!

  2. Organize supplies and materials. Some years the class can be left set up, other years it has to be packed into boxes. Either way I try to make sure the supplies are organized and packed in a way that makes back-to-school unpacking easy!

  3. Prepare blank name tags and labels. I may not know the names of students in my class, but I can make sure that name tags, cubby tags, and desk tags are laminated, organized, and ready to go.

  4. Re-label any storage bins (like the ones I have EVERYWHERE in my room) or cupboards.  By the end of the year, the labels around my room are often peeling or discolored.  Before I go I take a moment to re-label anything that needs it and move anything that could use a new space next year. 

  5. Organize student books.  I go through all of my books to repair any damages, recycle any that are beyond repair, and organize books back into levels or genres.  It’s great to start with an organized library. 

  6. Deep clean my teacher-desk.  By the end of the year, my desk is a M-E-S-S.  I don't always know where half of the papers came from, but I know it’s a great time to purge as much as I can 

  7. Photocopy lessons for the first week (or month!) back.  I like to have at least a weeks’ worth of back-to-school math, writing, reading, and get-to-know-you activities prepped and ready to go before I walk out the door.  That way, when the chaos of September rolls around, I am at least semi-prepped with a weeks’ worth of lessons to grab and go! You can see some of my favorite no-prep lessons for the first week back here.

If at all possible, I include my students in completing these tasks.  Most of these items are necessary because of how hard the classroom has been used by 22-28 students during the year, so I feel like it’s right to have them help with the re-set process for the next year. (And it counts as a life skills lesson… right?)   Is there anything I missed on my list? What is on your must-do list for getting done before summer break? Let me know in the comments below or chime in on instagram!

End-Of-Year-Organization-pin.jpg
How is Thermal Energy Transferred? Science for Kids

Teaching about how thermal energy is transferred in elementary science is so much fun because it’s a great unit to get totally hands-on. We build, we try, we experiment, and we really explore the different ways that heat is transferred. Here are some of my best ideas, experiments, tips, and tricks for teaching about thermal energy specifically for kids!

thermal-energy-science-lessons.JPG

When do you teach thermal energy in the classroom? 

I really don’t think it matters when you are teaching thermal energy, each season has its own benefits when you’re teaching about how heat is transferred.  I’ve always taught it during the winter when we can dive in to the concepts of conductors and insulators (because brrrrr, it’s cold outside). This way, we can warm up with a conducting mug of hot cocoa.

However, the spring/summer also works, because feeling the warmth of the sun allows kids to make great connections about how the sun is radiating heat.  Plus, a warm sun helps some fun projects, like this solar oven, really work!

The only timeline I follow is that I make sure I’ve covered ‘matter’ first in my curriculum. So many of our discussions about thermal energy and heat transfer refer to ‘particles’ and I want the kids in my science classroom to have a good understanding of matter, and how particles move in different states of matter.  I don’t want them to be confused when I mention that “the atoms bump into each other”, because we’ve already covered ‘what is an atom’ in previous lessons!

Where do you start with thermal energy?

I start every single science unit with a handful of teacher-led lessons.  Before we head into the experiments, inquiry, and student-led learning portions I always spend a class or two teaching vocabulary and new concepts.  I find that front-loading this knowledge gives students the confidence to explore and ask questions later on. 

In this time, we usually do some non-fiction reading about our new science topic (either reading passages at my students’ level, or books from the library) and then head to vocabulary practice.  I’ll set up a Science Word Wall with our new vocabulary and we’ll play some hands-on games until students are familiar with the vocab for our unit.  In thermal energy, I want them to be comfortable with words like convection, conduction, radiation, energy, conductor, insulator, and atom before we even begin.  

Get hands-on with experiments

Learn about the ways thermal energy is transferred in as many hands-on ways as possible. While teacher-led learning is fine, hands-on experiences is what will make the learning ‘stick’.  So when I’m teaching thermal energy I try my best to have as many hands-on science activities as possible.  

To teach conduction, we’ll have tea (or hot cocoa!) together.  If you are allowed to share beverages with your students, this is a great chance to make science class extra special!  Pour each student a warm mug of tea and allow them to hold the warm, but not too hot, mug in their hands.  They will feel the heat transfer rom the mug into their cool hands. This is conduction! 

To teach radiation I like to get outside on a warm and sunny day to feel the sun radiate and warm up our bodies.  Too cold for this?  Try gathering around a space heater!  (The heat from a candle is also radiation... but feel the heat from this one with caution around little hands!) 

I love experiments that need very few supplies.  In my first few years of teaching, I had access to very few additional materials at my school. My budget was unbelievably small (teacher life!) So my desire is always to find activities that can be done in classrooms for almost no money.  Ice Ice Baby is one of my favorites.  If you can freeze a class set of ice cubes, you are set! This experiment asks students to MELT an ice cube in their bare hands to experience heat transfer from their warm palms into the frozen ice cube. The full set of instructions for this fun and simple experiment can be found in my Thermal Energy Science Unit.

Have a bit more time and a few more supplies?  These instructions guide you through how to use heat energy to make s’mores in a classroom solar oven!

thermal-energy-digital-version.jpg

Let us plan your thermal energy unit!

Looking for a whole unit? The complete thermal energy science unit features nonfiction reading passages, vocabulary, teacher-led lessons, 3 hands-on experiments, a quiz, and detailed lesson plans all along the way.  No planning needed, just print and that’s it!


Biodiversity Science Lessons

There's something about being outdoors that is good for the soul. Thankfully, I live on the west coast of Canada so there are easily a half-dozen beaches within a ten-minute drive from my house, and they are stunning. Every time I go, there is something new to explore and discover. Biodiversity is a key part of our grade 3 science curriculum here in British Columbia and, between you and me, it's one of my favorite units to teach. There is just so much to unpack and the science lessons lend themselves so beautifully to student-centered learning. Take a peek at my ideas, activities, and tips for teaching biodiversity (the diversity of life) in elementary science.

Biodiversity: Lesson ideas, projects and freebies that teach all about our great big world. Image: a globe is pictured falling into a pool of water.

Biodiversity: Lesson ideas, projects and freebies that teach all about our great big world.
Image: a globe is pictured falling into a pool of water.

keep the biodiversity local

We always study our local biodiversity. While teaching about biodiversity in Africa may seem exciting, (yay for lions and tigers and zebras!) there is so much biodiversity in our own backyard. Teaching about the local diversity of life helps to give my students an appreciation for the plant and animal life that exists right where we are!

Biodiversity (1).jpg

Let us plan your biodiversity unit!

Looking for a whole unit? This complete biodiversity science unit features nonfiction reading passages, vocabulary, teacher-led lessons, project-based learning, a guided inquiry project, small group projects, and detailed teacher instructions all along the way.  No planning needed, just print and that’s it!

get outside

I like to teach our biodiversity science lessons when the weather is most likely to be nice (although, on the wet west coast, nothing is guaranteed), so that we can head outside to try and observe biodiversity in our own schoolyard.  

A number of times throughout the unit we will take a walk on our school grounds or in the neighborhoods surrounding our school. If your school policies allow this, a neighborhood walk is a free and fun field trip! We will head out with cameras or sketchbooks to make notes of the many different plants and animals that we observe on our way.  My students are often so surprised at the wide variety of bugs/insects/plants/birds that they can find in just a short 20-30 minute walk.

If you are able to bring a couple of smartphones (I had parent or high school volunteers come for this), the app Picture Ths is great for identifying local plants. If this isn’t possible, the app also works from a picture! Students can snap photos of local plants near their homes, and you can identify them using the app at school from submitted photos.

follow student passions

Towards the end of our study of biodiversity, we move to student-led learning. After students are familiar with ecosystems, food chains, living and non-living things, and the components of our local ecosystem, it’s time for a little project-based learning.  I let each student pick which part of our study of biodiversity interests them and RUN with it.  I once had a student do a project on a species of local moss... not my first pick but it made him very excited to research!

Students zero in on one specific plant or animal and do more in-depth research.  They place their subject into an ecosystem, learn about its place in the food chain, discover its diet, and explore any predator and prey relationships that it is a part of. The student becomes THE classroom expert on this plant or animal.

Image: An animal flipbook project on brown bears is displayed on a table.  A flipbook rubric is behind the brown bear project.

Image: An animal flipbook project on brown bears is displayed on a table. A flipbook rubric is behind the brown bear project.

We use my digital and printable animal research templates to complete these projects.  It ends up being so fun to watch students dive deep into something they care about.  At the end of the unit, we work together to come up with a way to share their learning.  Some years we do formal presentations.  Other years, we set up a ‘gallery walk’ where other classrooms can learn a bit about each animal.  My personal favorite was the year we filmed each student presenting their animal like they were the host of a Discovery show, and compiled all of the presentations into a class movie! 

“This fits in great with the BC Grade 3 Science curriculum. My 3s are enjoying the activities and I like that there are reading passages with questions for them to answer. So far we are half way through the unit and everyone is excited when it is time for Science! Thanks!” - Denise M. (A real-life teacher using the Biodiversity Science Unit in her classroom!)